Elasticache
The Elasticache version of Valkey has restrictions on what commands can be run, one of which is ACL SETUSER. We create a more secure storage environment by creating a new user for each application that is deployed. To do this with Elasticache we need to use the AWS SDK CreateUserCommand to create users.
In addition, for change notifications from Valkey to work correctly, the following parameter group must be added: notify-keyspace-events = AKE
Here is a bit of terraform that can be used to add this parameter group:
resource "aws_elasticache_parameter_group" "default" { name = "platformatic" family = "valkey8" parameter { name = "notify-keyspace-events" value = "AKE" }}A parameter group can also be configured through the AWS CLI or AWS Console.
Configuration
Section titled “Configuration”Assuming a role
Section titled “Assuming a role”Start by creating an AWS Policy that allows for the required access:
{ "Statement": [ { "Action": [ "elasticache:CreateUser", "elasticache:DeleteUser", "elasticache:DescribeUsers", "elasticache:ModifyUser", "elasticache:CreateUserGroup", "elasticache:DeleteUserGroup", "elasticache:DescribeUserGroups", "elasticache:ModifyUserGroup", "elasticache:DescribeCacheClusters" ], "Effect": "Allow", "Resource": "*" } ], "Version": "2012-10-17"}Next, create a role (platformatic-eks-elasticache) with the following Trust Relationship:
{ "Version": "2012-10-17", "Statement": [ { "Effect": "Allow", "Principal": { "Federated": "arn:aws:iam::${account_id}:oidc-provider/${oidc_endpoint}" }, "Action": "sts:AssumeRoleWithWebIdentity", "Condition": { "StringEquals": { "${oidc_endpoint}:aud": "sts.amazonaws.com", "${oidc_endpoint}:sub": "system:serviceaccount:platformatic:platformatic" } } } ]}Make sure that Statement[0].Principal.Federated is set to the correct OIDC Endpoint ARN.
-
Replace
<account_id>with the correct AWS account -
Replace
<oidc_endpoint>with the output from:Terminal window aws eks describe-cluster \--name platformatic \--query "cluster.identity.oidc.issuer" \--output text
The platformatic-eks-elasticache ARN will be
Finally, configure a YAML (elasticache.yaml) or update the existing values.yaml with the following structure:
services:  icc:    # The role used by STS, if not using direct credentials    elasticacheRoleArn: ""
    env:      # Inform ICC to use ElastiCache      PLT_APPLICATIONS_CACHE_PROVIDER: "elasticache"
      # Make sure the "notify-keyspace-events=AKE" parameter group is created      PLT_CACHE_MANAGER_CONFIGURE_KEYSPACE_EVENT_NOTIFY: "false"
    secrets:       # The region the ElastiCache cluster is hosted in       PLT_APPLICATIONS_ELASTICACHE_REGION: ""
       # Enter the cluster name, see "Finding a cluster name"       PLT_APPLICATIONS_ELASTICACHE_CLUSTERID_PREFIX: ""
Access credentials
Section titled “Access credentials”Follow the AWS documentation to create an IAM user and associated access credentials. Create an elasticache.yaml file or update an existing values.yaml with the structure below.
services:  icc:    env:      # Inform ICC to use ElastiCache      PLT_APPLICATIONS_CACHE_PROVIDER: "elasticache"
      # Make sure the "notify-keyspace-events=AKE" parameter group is created      PLT_CACHE_MANAGER_CONFIGURE_KEYSPACE_EVENT_NOTIFY: "false"
    secrets:       # The region the ElastiCache cluster is hosted in       PLT_APPLICATIONS_ELASTICACHE_REGION: ""
       # Enter the cluster name, see "Finding a cluster name"       PLT_APPLICATIONS_ELASTICACHE_CLUSTERID_PREFIX: ""
       # IAM access credentials       PLT_APPLICATIONS_ELASTICACHE_ACCESS_KEY: ""       PLT_APPLICATIONS_ELASTICACHE_SECRET_KEY: ""
Finding a cluster name
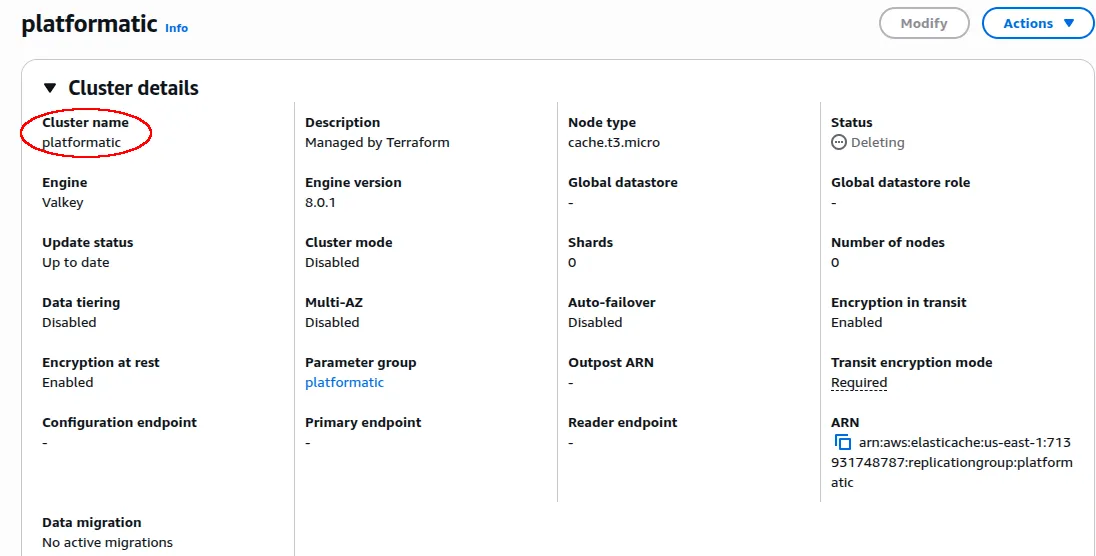
Section titled “Finding a cluster name”Visit the AWS Console find a cluster in the list. That is the name that is needed for PLT_CONTROL_PLANE_ELASTICACHE_CLUSTERID_PREFIX . Below is a screenshot of the cluster details.
An alternative is to use the AWS CLI to get a list of all available caches:
aws elasticache describe-cache-clusters --query "CacheClusters[].CacheSubnetGroupName"